Followers

Showing posts with label Christmas. Show all posts

Thursday, January 21, 2016

Pretty Paper...Dolls!


Hello, cyberlovelies!

It's my birthday today. I'm thirty-two. A thirty two year old who has earned every wrinkle, would be grey hair and memory.

Which makes me think about gifts. The gifts you give, and the gifts you get.

Some of my fondest gift memories are those made by the people I love: my grandmother's patiently knitted hats, scarves and mittens...the way all of my aunts and grandmother raved at my Mama's handmade pine cone wreaths...making harried Christmas Eve goody plate deliveries to each of our family's friends...

It was never the things we bought that I remember. It's the hand-made, "My-Mom-made-this-special-just-for-me" things...I miss them with wistfulness, now that I'm an old hag of thirty two.

In that same spirit, I try to do something home made for each of my nieces and nephews every year for Christmas. There is so much hustle-bustle and a huge focus on what we buy for each other. I don't really do birthdays, but I try hard to do it up for Christmas.

I spend months planning, prepping and actually making gifts for the five best love-muffins in the whole world (which, honestly translates to an excuse to scroll Pinterest, Reddit and facebook crafting groups and videos and still feel like I did something productive and useful....five or six hours later. Fellow crafters totally know what I'm talking about, right? Of course you do).

I get so excited to see them open and enjoy their gifts; sometimes they get them early and then I end up scrambling to come up with something else (like when I made David's "Sharknado!" sweater. More on that, later).

This year, I went searching for something that all three of the young ladies in my life could do together; yet still be fun and engaging for a wide age range.

About three weeks before Christmas, I came across this. It was a kit to make your own paper dolls:

greylustergirl_paper_doll_kit.jpg

I thought this was perfect: it was a way for each of the girls to make and do crafts and it could be tailored to each kid.

I found it through Pinterest when I googled DIY gifts for kids. It took me to this site:

Grey Lustre Girl's Paper Dolls

When you go to the site, it takes you to the most recent blog entry. The kit entry is hard to find. But if you google "12 days of DIY Christmas + paper doll kits", this should come up.

But, I looked at a picture of the kits contents and it inspired me:


greylustergirl_paper_doll_kit2.jpg

I thought that the kit looked pretty simple to make. It wouldn't take much time and would be an easy project that was relatively cost effective, considering that I had to make three of them.

I didn't like that the kits were housed in a basket/box made out of paper. It would be too flimsy for travel or mailing and was pretty basic. So I decided to skip that part. If you like the paper box-holder, there is a pattern for it on the Silhouette online store.

I had purchased some plastic lunch kits over the summer that I had planned to personalize and give to them as "Back to School" gifts. They went shopping for school stuff and bought lunch bags. So that was the end of that. I put them in the closet and promptly forgot about them.

Then, the idea for the kits came and I realized that the lunch boxes would be perfect - they were sturdy and could hold a lot. They look like this:
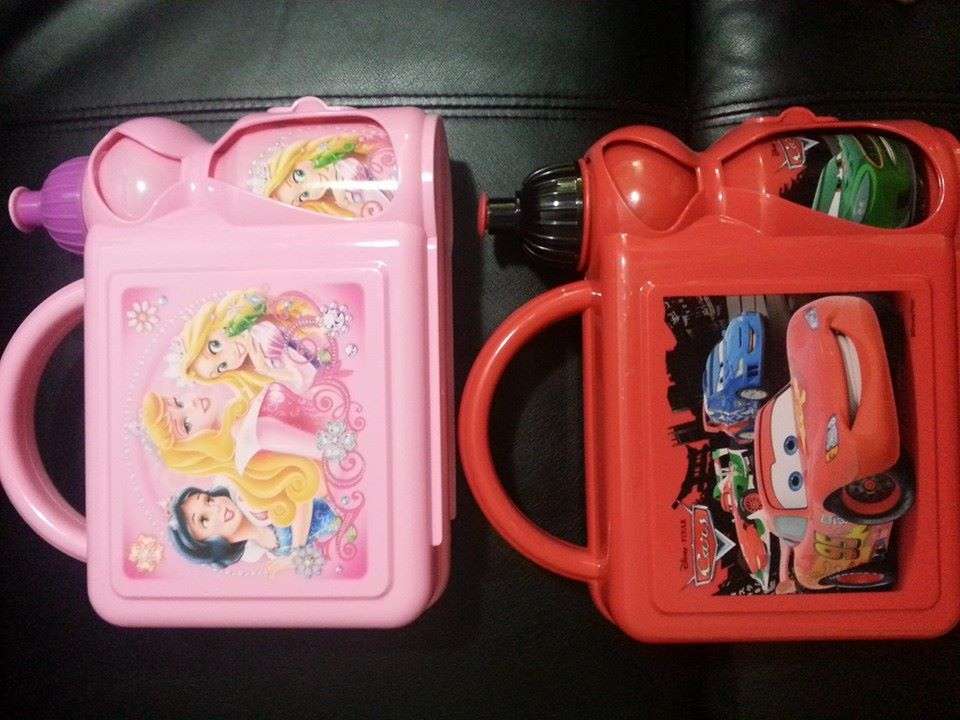

The ones that I chose did not have the Disney characters on them. They were plain plastic. I knew that I was going to alter them, so I didn't want to have to contend with peeling off labels, etc. This is the closest facsimilie (because I didn't take a before picture) that Google could come up with. The structure is the same. The shape is slightly different.

I got 5 of them for $2 each.

I used the original box as a jumping off point. I felt like the supplies included in the original kit were a little lacking and not as much fun. So I made a plan and went nuts at the dollar store in the crafting section.

I bought "crafting sticks" that were painted in rainbow colors, like this:


because I thought that the plain ones were boring. They came in a package of 100, so each kid got 20 or so (extras in case you make mistakes or want to double them up for sturdiness), bundled up with raffia.  

I bought pompoms in every color and size I could find. 


I had some pipe-cleaners left over from another project. But when I found metallic ones (yay, sparkles!), I just couldn't resist. Because I cut the pipe cleaners to fit the containers that I was storing them in, I only used 2-3 of each color (cutting each into thirds) So there was plenty left over for another project.

I added feathers, also. I wanted the girls to have lots of options to personalize their dolls. The package included lots of different sized feathers in several different colors, including some metallics.


I bought a bag of mixed colored sequins, also. I had some red ones, already, but I felt like a jewelled dress needed more than just red. There are other great colors, too! Then, I mixed them together.

 I purchased a 4 pack of glue sticks (only came in multiples of 4) and a 3 pack of small bottles of white glue. Sometimes, you need different kinds of glue for the job!

I purchased all of the craft supplies at Dollar Tree for $13 for the lot. I didn't need nearly as much as I had purchased. I had a great deal left over that I'll use for future projects.

I went to a beading store, and purchased three bags of randomly mixed seed beads for $4. The beads available at the dollar store were too large and would have been too heavy to glue to a paper doll.

I mixed them all together in a large bowl when I got home. More on packaging follows...

I also included a set of scented paints (that I found at another dollar store). They came in a set of 3 for $2.50 and looked like this:


I also included a paint brush in each kit. A package of 5 was $1 and I got to keep the left overs.

I put in a strip of about 30 mini stick on "diamantes": sometimes, a dress just needs a little bling! I already had them; just raided my scrapbooking supplies!

The entire shopping trip took about two hours, including both stops. Thinking on it now, the only thing I didn't include was 'eyes', which I had and regret not including

To make the actual dolls (bodies, hair and dresses), I used a die-cut pattern that I downloaded on clearance from the online store for my cutting machine (the Silhouette Cameo). Cost for the patterns (which I get to keep forever) was $5.

The bodies for the dolls looked like this:


Each girl got 15 doll-body patterns. Ten planned dolls, and 5 extras for do-overs.

There were three patterns for different hair styles, that looked like this:


I cut doubles of each so that there was a front and back to the head. I cut each in brown, black, yellow and "red", so that there would be plenty of choices. 

I downloaded several options for outfits....pants, shoes, bathing suits... but settled on "just" dresses. I thought that the other options had pieces that were too fussy and might be hard for little fingers to manipulate. This is the dress pattern I chose:

I cut several dresses from different patterned 12"x12" scrapbooking paper that I already had.  I used some solid cardstocks and other "fancier" papers (purple leopard print, sparkly florals).

Each girl got duplicates of each dress, so that she could personalize them, or have extras for do-overs. I am a *BIG* fan of crafting do-overs!

I chose not to include the shoes. They didn't cut well and were hard to remove from the mat, so I left them off. I also felt like they were too delicate for little hands!

The cutting process for all of the pieces took about two hours.

I sorted each of the pieces into snack sized ziplock bags and labelled them with printed lablels I created using an Avery program. I already had the labels.

Sorting and labelling took about one hour.

To store the supplies, I wanted something more than a bag, stapled closed, as featured in the original kit. I could see that spilling out into a mess that receiving parents would hate me for.

So, I up-cycled a pile of old pill bottles that were given to me. It was easy to clean them and peel the labels.

I painted the bottles and lids with different colors of Krylon (plastic adherent spray paint - there was no way I was going to do all of that with a brush!). I didn't really *need* to paint them, but I felt like it gave the kits a little something special.

You can get Krylon in about 400 colors (some sparkly!) for about $6/can at Wal-Mart (which is where I got it), in the paint section. If you are a person who shops by labels, here you go:

I strongly reccomend specifically purchasing the bottles that say "bonds to plastic" right on them, like this:
They generally adhered better and coated better also. 

The ColorMax and ColorMaster varieties did not do as nice of a job, so don't be tempted by the array of options. (Bottes look like this):

But, they were paints I already had from another project, so I used them.

Because I had to paint two coats (which meant waiting for them to dry), the painting process for all of the pieces took about three hours, over two nights.

Here is a shot of the painted bottles (filled):

You can see that some of the paint didn't totally adhere to the lids (I'm hoping the girls didn't notice!). You can also see my kitchen/crafting table, covered in a rainbow of Krylon. I haven't had time to clean it, to this day.

***Side note:*** I have a bottle of Varsol somewhere in the depths of my craft supply box(es) that I intend to clean this table with!

The following shot is all of the kit pieces together, including the die cuts:


There were things added after I had taken the content picture. Each kid got a bottle of glitter for their dolls also. I was going to mix it together so that each one was the same, but I reasoned that they would likely be making them together and could therefore share with one another.

The actual physical containers took not very much time at all. By the time I was ready to paint them, I had already figured out that I needed to use the bottles of paint that said "bonds instantly to plastic!" for the fastest, easiest and smoothest application.

Painting them took about 1.5 hours, simply because I had to wait for each to dry individually (including second coats), before I could paint the next. My table was just not big enough!

In reality, individual painting time was about 5-8 minutes per coat. I did not paint the insides (as you will see in shots that follow).

Here is what the boxes look like, fully packed. I put the sticks, brushes and glue stick inside of the water bottle, to ensure that I had enough room for everything. I cut the paints in half (groups of 3) so that they would fit in the kit. All of the die-cuts and bags are underneath:


I chose not to paint the bottles.

I cut each of the girls' names with fonts associated with my cutter. I tried hard to pick fonts that I thought reflected them.

I started with Kayleigh's. It looks like this:


The font is called "LD Fill-in".

I didn't center the letters so when I finished it, it looked odd. So I added an embellishment I dug out of my scrapbooking supplies.

This is Hannah's:

The font is called "Cricket Font". 

To embellish hers, I used foam stickers I got in a Valentine kit I bought at Target, but ended up having no use for. I was glad to find a use for them - the bag of stickers was still unopened!

This is Shaelene's:


The font is called "Daisy". 

It is my favorite, and the only one to feature a cleverly disguised finger print. 

In this case, the embellishment was simple, and was also pulled from my scrapbooking supplies. I love it.

I applied and sealed all of the letterings and embellishments with Mod-Podge matte sealant (I wanted the glossy stuff, but that was all that was stocked at Wal-Mart). It costs about $6 for a medium-sized bottle.

I applied it liberally (and still had 3/4 of the bottle left over) with a sponge brush. It took about an hour to dry with no tack (don't test: you'll get finger prints that you'll have to conceal. Trust me. Just leave it). 

I packed them all carefully and wrapped them for Christmas. Of course, they got to open their gifts early.... within seconds... doll kits everywhere!

Total cost for all 3 kits: $40.50 or $13.50 per kit. Which I think is pretty amazing when you consider what it costs for a good art kit, paying retail!

Pictures of completed dolls pending....

Good night, friends. Thanks for sticking your head in my little corner of the web!

Love to you! xo

Thursday, April 30, 2015

Carrying Moonbeams Home in a Jar: The Christmas Jar Project

Hello, friends!

The blog detailing my mosaic adventures was so well received, I decided to write one for the jars I made for my nieces and nephews for Christmas.

It all started with a late-night Pinterest browsing session (Pinterest is the Devil. The Devil, I tell you!). I was looking for something that was super-cool and could be uniquely customized for each kid.

The inspiration came from "Teacher Thank-you Gifts", from this blog: DIY Teacher Gift in a Jar. I thought that the description was good, the pictures were appealing, the steps were explained pretty well. Each step came with pictures and I figured only an idiot could screw this up.

Here's a picture of the featured finished project that started it all:

I knew I could make them to look however I wanted, and I didn't need to follow the steps exactly. I used it just as a jump-off.

Little did I know - Pinterest LIES! - but more on that, later...

I already had five glass jars (I save them for putting stuff in: yay for recycling!). They were all similarly shaped, with about the same volume capacity. They were tall salsa jars, like these:


Before I could start decorating them, I had to remove the labels. I washed them in hot, soapy water repeatedly with little success.

I tried soaking them in hot, soapy solution (in a bucket) for several days. Most of the label came off, but I couldn't get rid of the machinated lines of glue...even after putting them through an industrial sterilizer/dishwasher.

Finally, I ended up just using a boxcutter blade to scrape it off (I was worried about scratching the glass, but this was not to be). It worked better and faster than all the previous methods I had tried.

I really wish I had done that first. 

When all the glue was scraped cleanly off, I washed them again. Then I cleaned them with glass cleaner (inside and out). I wanted to make sure that the paint adhered *very* well.

From start to finish (including all three attempted methods), cleaning all five jars took approximately 6 hours total (spread out over about a week). If I did it again, I would skip cleaning three hundred times and go directly to scrape-off method.

I would guess about half that time would be required from start to finish for cleaning, depending on your scraping speed (and if you don't watch TV while you do it, like I did).

I already had several bottles of acrylic paint (purchased at a dollar store. I had primary colors, white, black, silver and gold). You can get them anywhere. I used "Crafter's Acrylic" brand. Label and bottles look like this:

Having these colors as a starting point allows you to mix and make any color you like.

I started off eager, squirting gobs of paint into the first jar, expecting it to roll and coat easily, like this video I found on YouTube said it would:


It did not. I tapped and smacked the crap out of those jars to get the paint to move. At one point, I was worried I might slam my hand through the base of the jar.

Reflecting on it now, I think I should have thinned the paint out somehow. Perhaps it wasn't viscous (runny) enough.

I also watched this one on tinting - and considered aborting the painted method in favour of this:


Until I discovered I did not have a bottle of Modge Podge. Also, I wanted the jars to be opaque, because I was stuffing them with gift items: I didn't want the surprise ruined.

So back to the painted method I went.

I used the same method as detailed in both the videos; squirting paint into the bottom and strategically along the sides (later on) and rolling it to coat the insides. Adding aforementioned smacking. 

When I started, I didn't really have a plan. I was just painting. I was having a grand old time making a huge mess (forgetting that I would be the one to clean it up). It was very un-thirtysomething of me.

I kind of had an idea of which colors I wanted to put together, but that was about it.  I was playing, just having a good time. I layered colors on top of each other to see what would happen if I rolled them into each other or around each other.

But then I started to run out of paint. I really didn't want to buy more supplies for this project, so I had to really think about what I was doing and the colors I was using in order to use only the resources I already had.

When painting, I tipped out the excess back into a container. If the colors were mixed in an unpleasing residual, I threw it out after draining it onto newsprint.

When I was done painting, I set them bottom-up  on top of newspapers to dry and allow any extra paint to dribble out. I set it next to an open window to dry.

The entire painting process took about 5 hours, spread over about 3 days.

Drying the paint took about three days, which shocked me.

I wanted the jars to be completely dry inside (because I was filling them and didn't want paint on candies, etc). They were tacky for a very long time.

I thought that putting them open-end down might be hampering their drying speed, so after I was sure that there wasn't going to be any more dripping paint, I put them right side up on the windowsill.

It made no difference whatsoever in the drying time. It did, however, give me a cold.

Painted all of the lids (except one) with a "wet black" paint (that I already had, specifically for metal).

When I painted David's jar, I forgot to shake the gold paint. So I ended up with watery residue with glitter (kind of like the goo that comes out of the mustard bottle) on my paint. I squirted it alongside another color. The water caused it to wash out, so I had a painted glass look, like this:


It washed out most of the side of the jar. I was really mad about it, too, because I thought that it would mean having to start all over again.

Moral of the story: always shake the paint.

But I left it for the night and went to bed.

When I came back to it the next day, I decided that I would use comic strips that had like colours to cover up the botched paint job. It would look like I meant to do that, and my nephew would never know the difference.

I looked through a stack of discarded comics on a for-purchase table at the Public Library until I found some pictures that matched what I was going for (yes, I brought the jar with me!).

I paid 50 cents for five comics. I used what I wanted. I kept the scraps for future projects as I only used a page or two from each of the books.

I cut the pictures that I wanted and used glue to adhere it.

I used leftover "No More Nails" (from another project), by LePage ($7/tube, Home Depot) which looks like this:


Construction adhesive is probably overkill for this project, but I found that the pointed tip made applying delicate pieces easier. Also, using a stronger adhesive assured me that none of the little bits and pieces would fall off when I boxed, wrapped and transported them.

For the topper, I used a collectible toy statue of 'Thor' that I broke the base off of and glued down. I purchased it for $1 at Target. I thought it was a lot bigger than it turned out to be; I might have added a few more.

Here is a top-down shot:


For Kayleigh's jar, I deliberately incorporated colors that I knew were her favourites (as told to me by her dad): sparkly blue and a bit of green and white. I wanted it to be girly, but not too girly.

To decorate the outside, I used some lavender die-cut flowers (1' dia. and 1 1/2' dia.) that I dug out of my scrapbooking box.  I used smaller flowers (in orange and pink) in the centers of each flower, layered on with glue.

They were cut from heavy cardstock. I chose these deliberately because I didn't want them to bend or crease. I wanted them to stand in relief from the jar. Like this:


When the flowers were attached, I felt like they were missing something. I found a bag of sparkly red sequins that had spilled into the bottom of a craft box and decided that they would be perfect.

As above, I placed one sequin at the end of each petal and one in the center of each smaller flower.

The construction adhesive was too heavy for this step. It drug the sequins down until they fell off. So, for this step, I used plain white glue and applied each sequin with a toothpick.

I repeated the sequin patterning on the lid and added a die-cut as well. Here is a closer shot of the lid, from the top down:


The sequins dried quickly when I put them next to the open window.

I was very pleased with how this one turned out. I thought that it was a good match for her personality: lively and gregarious. Fun and a little bit girly.

Here is the finished product:


For Shaelene's jar, I knew that I wanted something girly and pretty and princess-y. She likes to get her nails done and wear dresses all the time, so I wanted this to be very simple but beautiful and lady-like. Like Shae.

I started with red; the bottle was almost empty and the air inside helped to create the 'flecked' look I liked so much. I added white paint, and rolled it around, then layered in some pink I mixed together in a snack cup (so I could throw it out when I was done).

When I tipped the jar upside down to dry, the running helped accentuate the red flecks; I was thrilled about that.

For the topper, I used two silk roses. I took the rose off of the stem and threw the rest away.

I tried to keep the green plastic bits on the bottom, because I liked the color contrast, but I couldn't get them to sit flat like I wanted. So I removed the green plastic.

The petals separated into layers of fabric, so I had to press them on one at a time. I held them down in the center to make sure they stuck to the base (and to each other), which is why they look as if there's a well in the center when you look at it from the top down.

For this step, I used the construction adhesive, because I wanted to make sure they stayed on. I used two disassembled artificial roses to achieve the look I wanted. Here is a top-down shot:


Here is a shot of the completed jar:


I painted the jar for Mason first of all. It was the largest jar (a pickle jar). Because this jar was a bit larger than the others, it took more paint to cover the inside.

When it was done, I spent quite a bit of time trying to figure out what I would decorate the outside with. Then I found a bag of sparkly foam star stickers I had bought for another project, but never used.

I liked that they stood in relief against the jar. I also liked that the glitter on them made them bumpy and tactile.

I purchased it at Wal-Mart in the scrapbooking section for about $3. There were three sizes and colors of stars in the package and matched the colors I had chosen.

They were sticky-backed, but the adhesive would not take to the glass. So I put a little bit of NMN on the back of each one and held it until it was stuck. It bonded solid in 24 hours.

I glued three stars to the top, as a topper.

Here is a top down shot:


I did not take a shot of the completed jar, because you couldn't see the topper anyway, so it would have just been a shot of what you see here.

Hannah's jar was painted the quickest, and took the least time. I used black paint for hers (the same I had used on the lids of the others). It was quite viscous and runny (not acrylic) and coated the jar in about ten seconds.

I added some "plastic diamonds" (I don't know what else to call them) that I had left over from another project. Wal-Mart had packages of them for about $4 each, like this:


The ones I used were similar to this, but larger, with no adhesive backing. I got them at a beading and jewelry making store. There were about 40 in bag for $1.25.

The shape of Hannah's jar was narrow at the neck and in the middle, like this:

It kind of reminded me of a dress-maker's mannequin. I thought that the shape was elegant and lovely, perfect for a young lady.

Plus, I also figured that she would be the most flexible about a jar that looks skinnier...which might be perceived as less full (more on that later)!

So when I decorated it, I kind of had a fancy dress design in mind.
I used a "wet black" paint that (I already had) to coat the inside. This time around (of course the last time!), painting it was much easier. The paint was thin and viscous, coating the inside of the jar in literal seconds. I almost dropped it from surprise. I was expecting it to be much more time consuming to paint, like the others.

Because the overall color was black, I decided that painting the lid black also was too much. I chose white.

I had some wired ribbon left over from another project that I tied around the middle of the jar. I thought that this made the dress look as if it were 'belted'; like this:


I put the "plastic diamonds" in two rings around the neck of the jar (to look like a fancy necklace). In actual fact, I used two layers of jewels to disguise the uneven finishing line of the paint inside. The jewels went to the top of the jar neck, flush with the lid, concealing it perfectly.

They were adhered with NMN, as with other external decorations. I wanted the hold to be permanent.

I didn't put a topper on this jar. I tried several different options and didn't like any of them. I decided I liked it better plain, so I left it.

All told, the painting and decorating process took about three hours per jar (the detail-y pieces were very time consuming) for a total of fifteen hours, spread over about two weeks, not including paint-drying time.

Which brings me back to "Reasons why Pinterest Lies!": This was indicated as a beginner's project that could be done in one afternoon. *One*. With an adult doing everything, no small hands...no giant messes.

Beware, newbies! Beware.

Moving on. The part that had nothing to do with Pinterest:

I knew I couldn't give a kid an empty jar if I really wanted the wow factor; no matter how much time I spent making them look cool. An empty jar is definitely not as cool as a full one.

So I decided that I would fill them up with presents. Most of the things I got in the One Spot ($1) section at Target. They had some cool holiday stuff!

Some of the things were Christmas-y, like these reindeer glasses, which I modeled:

 
There were Christmas themed pencils (which I had to cut the end off of to fit in the jars). I wrapped them with a cute little curlicued ribbon.  Like this:


I found a package of silicone finger puppets that I loved. There were five in the package, which I got for $1 at Target. I was worried that the kids wouldn't know what they were for, so I took a pic that I intended to include with a letter that I never inluded. But here is a picture, just for you:


I filled the jars with candies, some I stashed from visits to restaurants, some I bought (stick candy from Bulk Barn, 5/$1):

These are my favourite after dinner suckers from East Side Mario's - before the boycott - I had about 30 of them.

This is a photo of Kayleigh's finished jar, including the contents, before I filled them all:
Candies, pencils....my favourite piece was the little hand. It's a clapper that has a glowstick for a handle! Each kid got body wash..."Hello Kitty" and "Avengers". I may or may not have had to replace one I kept for myself.

Total cost for the jar fill contents was $20/$4 per jar.

Some items I got for free. Rubber promotional bracelets, etc.

I continued to pick up  little things I thought would go well in the jars (that are not in the pic) right up until I wrapped them.

When I was done, there was *no* more room for anything else.  Here are all five, finished:


I sent each of them a Christmas activity book that I put together with .pdf's and puzzles that I found on the internet. It took me about 10 minutes of searching, . I send some kind of activity book or coloring pages with each package I send them.

I put their names on each one (so that they would be able to tell which one was theirs once they got going) and put them in an envelope that I decorated with some glitter (I already had) and drew on some funky lettering.

As always, I sent a movie (usually just a copy of something cool). This time I sent "Secondhand Lions", with Michael Caine. It was a great movie. You can watch a clip, here:


I tucked it all in with a little love note and some stamps so that they could write me back.

Here is a shot of all five completed jars, with the decorated envelope:


Happy Christmas, my little love muffins! Pay no mind that I wrote this in April!